Does the professional mode or manual mode in smartphones provide the ability to take better photos with higher quality or can it provide shots that you cannot take with other automatic shooting modes on smartphones!?
This is what we are trying to discover in this article, in addition to showing the steps for using the professional mode (manual) to control all the details of the image and get the best shot as if you were using a professional camera, it is worth noting that we showed you in the previous article The best phones in terms of camera In 2021 you can check it out after reading this article to master mobile photography :).
Does my smartphone camera have a manual shooting mode?
Photographers argue that the best camera is the one you already have, and in most cases, it will be your smartphone. Although mobile phones have not always offered a great shooting experience, technical advancements have made them almost at the same level as many dedicated professional cameras. However, having a high-quality camera is only half the battle.
It would be better to learn how to get the most out of it, nothing beats shooting in manual mode or professional mode, but most smartphone users are not familiar with how to use manual shooting mode on smartphones.
With manual controls, you can adjust settings as you like to produce the image you really want. We know manual mode can be tricky for casual users, especially those without knowledge of advanced camera theory. While photography is a cross-cutting topic, we can teach you the basics and have you shoot manually with your smartphone in no time.
Most modern smartphones come with some form of manual mode within the camera app. They might fancy calling it professional mode or something like that. Just go to the camera app and look at your shooting modes to see if your phone has manual shooting capabilities.
Third-party manual cameras
The good news is that we are dealing with an Android operating system, so anything is possible. Does the camera app have a manual mode? Just go and download an app from the Google Play Store. Here are some of our favorite third-party camera apps that come with manual mode:
- Adobe Lightroom
- Manual Camera DSLR Camera Professional
- ProShot
- Open Camera
- Camera FV-5
You can also learn to explain the steps isolated photo background Online without experience.
Keep in mind that this is a general guide. We can’t tell you exactly how to boot your smartphone into manual shooting mode, simply because all devices come with different camera apps. They all look and work a little differently especially if you are using a third party app.
exposure triangle
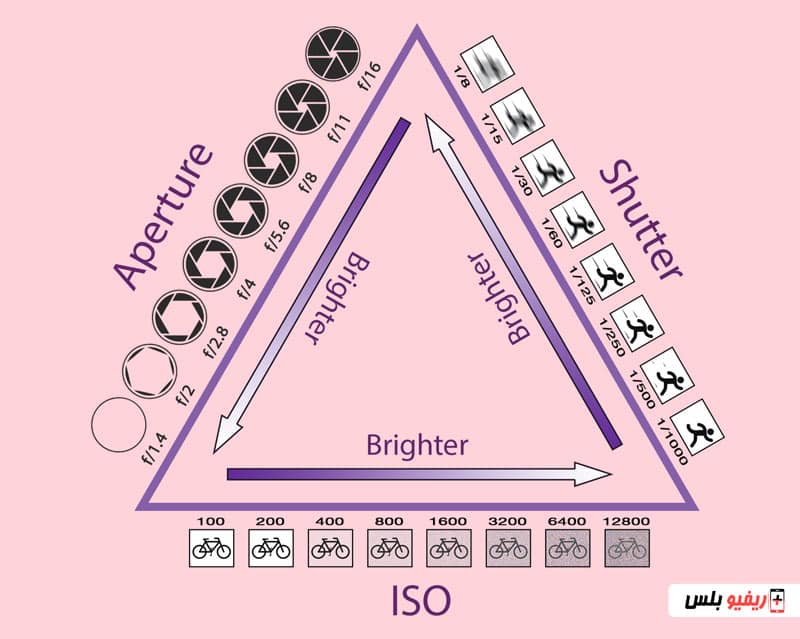
Let’s start by understanding what it takes to properly expose an image. This is critical for shooting in manual mode. In photography, the exposure triangle represents how ISO, aperture, and shutter speed work together. You must find a balance between these three elements to display the image correctly while keeping in mind how changing each element will affect the quality.
We definitely want to keep things very simple, so we’ll identify each factor and tell you how changing it affects the image.
ISO control in manual shooting mode
ISO stands for “International Organization for Standardization,” which is responsible for standardizing sensitivity ratings for camera sensors. When shooting, changing the ISO will determine how sensitive the sensor is to light.
A lower ISO will make the sensor less sensitive to light, which means you may have to make the aperture wider and/or slow down the shutter speed. At the same time the image will be cleaner and clearer.
Increasing the ISO will allow you to capture light faster, allowing you to speed up the shutter or widen the aperture, but it will also produce an image with more digital blurring or noise. The image quality decreases as the ISO increases.
shutter speed control
Camera systems have a shutter that covers and exposes the sensor. The shutter speed determines the length of time that shutter will remain open to allow more light to reach the sensor.
A faster shutter speed will reduce exposure, but will make images sharper. Similarly, extending the shutter speed can create motion blur, but will allow light to enter for a longer period of time, providing more exposure when shooting in manual mode.
You have to pay a lot of attention to the shutter speed and use it in proportion to the level of lighting to get the best picture.
Aperture of the phone camera in the professional mode (manual)
Camera systems have a diaphragm, which is a hole through which light must pass to reach the sensor. The aperture controls how wide or narrow that opening is.
A wider aperture will increase the exposure. This will also reduce the depth of field and make the background/foreground more blurry. If you want to focus more, a narrower aperture will work better, but you will have to compensate for the lost exposure by adjusting the ISO or shutter speed. In this case, a larger number indicates a narrower aperture. For example, f/1.8 is wider than f/2.8.
Most users will not have to worry about this, as the slot is usually not controlled in smartphones. The only exceptions come from Samsung. The company introduced a dual aperture with the Samsung Galaxy S9, which allows you to switch between f/1.5 and f/2.4.
They have also used this technique with the Samsung Galaxy Note 10 and S10 series. However, Samsung abandoned that feature with the Galaxy S20.
You can also see: Steps explained download google camera The best photography app for your smartphone.
White balance in manual mode
White balance is a very common setting that you’ll likely find built into even the most basic camera apps. This setting sets the color that represents the white light, so it will change all other colors as well. This allows for creative use of both warmer and cooler shots.
White balance in manual mode is also useful when compensating for any color shift your light sources may cause.
If you notice that your captured images always look orange, this is the feature you want to tweak.
On a basic level, you’ve probably seen white balance settings that allow you to compensate for sunny or cloudy outdoor shots and incandescent or fluorescent lights. Above these basic settings.
Some manual mode applications offer color correction with a full Kelvin (K) color temperature scale. This allows finer tuning of the white point, between hyper-red at 2,000 K and blue at 9,000 K.
The white balance settings in this image are from top to bottom: Shade, Sunlight, Fluorescent, Auto, Incandescent.
One alternative to making this decision at capture time is to hold off to capture a RAW image, which we’ll get to in a matter of seconds.
Exposure compensation
If you have ever seen a camera button with “+” and “-” in it, this would be the exposure compensation control. Most smartphone cameras also have exposure compensation, and this helps when any of your settings are in automatic mode (you can leave the settings in automatic mode, even in manual mode).
Cameras try to get the correct exposure by metering the light, but they don’t always get what they intend to capture. Sometimes you just want some photos to look darker or brighter. With exposure compensation, you can tell the camera that it is taking the exposure incorrectly, and it will compensate for this by adjusting the settings in Auto mode (usually ISO).
Exposure compensation is usually measured in stops such as: -1.0, -0.7, -0.3, 0.0, +0.3, +0.7, +1.0. In this case, -1.0 would be 1 pip lower, while +1.0 would be a higher stop.
Capture RAW images for complete control of color and contrast
Many phones these days have RAW support. A RAW image is known as an uncompressed, unedited image file. It keeps all the data captured by the sensor, making it a much larger file, but without quality loss and more editing power. This is why RAW data by itself isn’t much to look at.
RAW should only be used if you plan to go back to editing your photos. File sizes are much larger, but this allows you to adjust the full color and exposure settings of your photos, bypassing the camera’s default image processing.
While saving an image as a JPEG, the image data is discarded and compressed, which is perfectly fine if you plan to upload an image to Facebook or other social media sites for example.
Also keep in mind that photography is about more than just lighting and settings. A good image has soul and character. You will need to learn some other basics to turn a good photo into a work of art but this article is the beginning of the road to a professional photography.

